No title
title: OpenWrt 的安装使用 date: 2023-04-16 11:15 author: 陌上人如玉 comments: description: keywords: top_img: cover: toc: toc_style_simple: mathjax: katex: aside: true aplayer: highlight_shrink: tags: 未分类 categories: 未分类
Introduction
注意
Openwrt 界面很多数据修改了并不会生效,甚至造成系统文件错误,所以最好用命令行来执行。
固件下载
常用命令
注意
app 配置文件一般在
/etc/config/文件夹下系统服务和任务启动脚本在
/etc/init.d/文件夹下
OpenWRT19.07_命令行_重拨 wan_重启路由 查看 cpu 信息:cat /proc/cpuinfo 查看已安装包信息:cat /usr/lib/opkg/status 查看架构信息:opkg print-architecture ,在/etc/opkg.conf文件中 重启网络:/etc/init.d/network restart 重载网络配置:/etc/init.d/network reload 修改网络配置文件:vim /etc/config/network 修改无线网络配置文件:vim /etc/config/wireless 查看防火墙状态:/etc/init.d/firewall status 关闭防火墙:/etc/init.d/firewall disable /etc/init.d/firewall stop 开启防火墙:/etc/init.d/firewall enable 重启:reboot 关机: poweroff
安装教程
ophub 版安装步骤
修改网络配置文件,将 IP 设置为192.168.1.3只要不是 1,就可以访问. 修改网络配置文件:vim /etc/config/network 重载网络配置:/etc/init.d/network reload 关闭软路由 dhcp 功能。 添加默认 dns:192.168.1.1,否则无法更新包。
默认配置文件
/etc/config/network
config interface 'loopback'
	option device 'lo'
	option proto 'static'
	option ipaddr '127.0.0.1'
	option netmask '255.0.0.0'

config globals 'globals'
	option ula_prefix 'fdef:7a32:9e49::/48'

config device
	option name 'br-lan'
	option type 'bridge'
	list ports 'eth0'

config interface 'lan'
	option device 'br-lan'
	option proto 'static'
	option ipaddr '192.168.1.5'
	option netmask '255.255.255.0'
	option ip6assign '60'
	option gateway '192.168.1.1'
	list dns '192.168.1.1' # 可选dns
	list dns '114.114.114.114'

config interface 'docker'
	option device 'docker0'
	option proto 'none'
	option auto '0'

config device
	option type 'bridge'
	option name 'docker0'
/etc/config/wireless
config wifi-device 'radio0'
	option type 'mac80211'
	option path 'platform/soc/ffe03000.sd/mmc_host/mmc0/mmc0:0001/mmc0:0001:1'
	option channel '36'
	option band '5g'
	option htmode 'VHT80'
	option disabled '1'

config wifi-iface 'default_radio0'
	option device 'radio0'
	option network 'lan'
	option mode 'ap'
	option ssid 'OpenWrt'
	option encryption 'none'
安装 openclash
解决 OpenWrt 下安装插件缺少依赖、架构不兼容、依赖冲突的问题 官方源版本
src/gz openwrt_core https://downloads.openwrt.org/snapshots/targets/armvirt/64/packages
src/gz openwrt_base https://downloads.openwrt.org/snapshots/packages/aarch64_cortex-a53/base
src/gz openwrt_luci https://downloads.openwrt.org/snapshots/packages/aarch64_cortex-a53/luci
src/gz openwrt_packages https://downloads.openwrt.org/snapshots/packages/aarch64_cortex-a53/packages
src/gz openwrt_routing https://downloads.openwrt.org/snapshots/packages/aarch64_cortex-a53/routing
src/gz openwrt_telephony https://downloads.openwrt.org/snapshots/packages/aarch64_cortex-a53/telephony
将官方源换为清华源: sed -i 's_downloads.openwrt.org_mirrors.tuna.tsinghua.edu.cn/openwrt_' /etc/opkg/distfeeds.conf 将清华源换为官方源: sed -i 's_downloads.openwrt.org_downloads.openwrt.org_' /etc/opkg/distfeeds.conf 参考 参考 一、 安装依赖
- 卸载
dnsmasq,因为默认的不完整,需要安装dnsmasq-full
1 | opkg remove dnsmasq |
- 安装依赖(除了 luci-compat)
1 | opkg install luci luci-base iptables dnsmasq-full coreutils coreutils-nohup bash curl jsonfilter ca-certificates ipset ip-full iptables-mod-tproxy kmod-tun luci-compat |
⁃
Flippy 版安装步骤
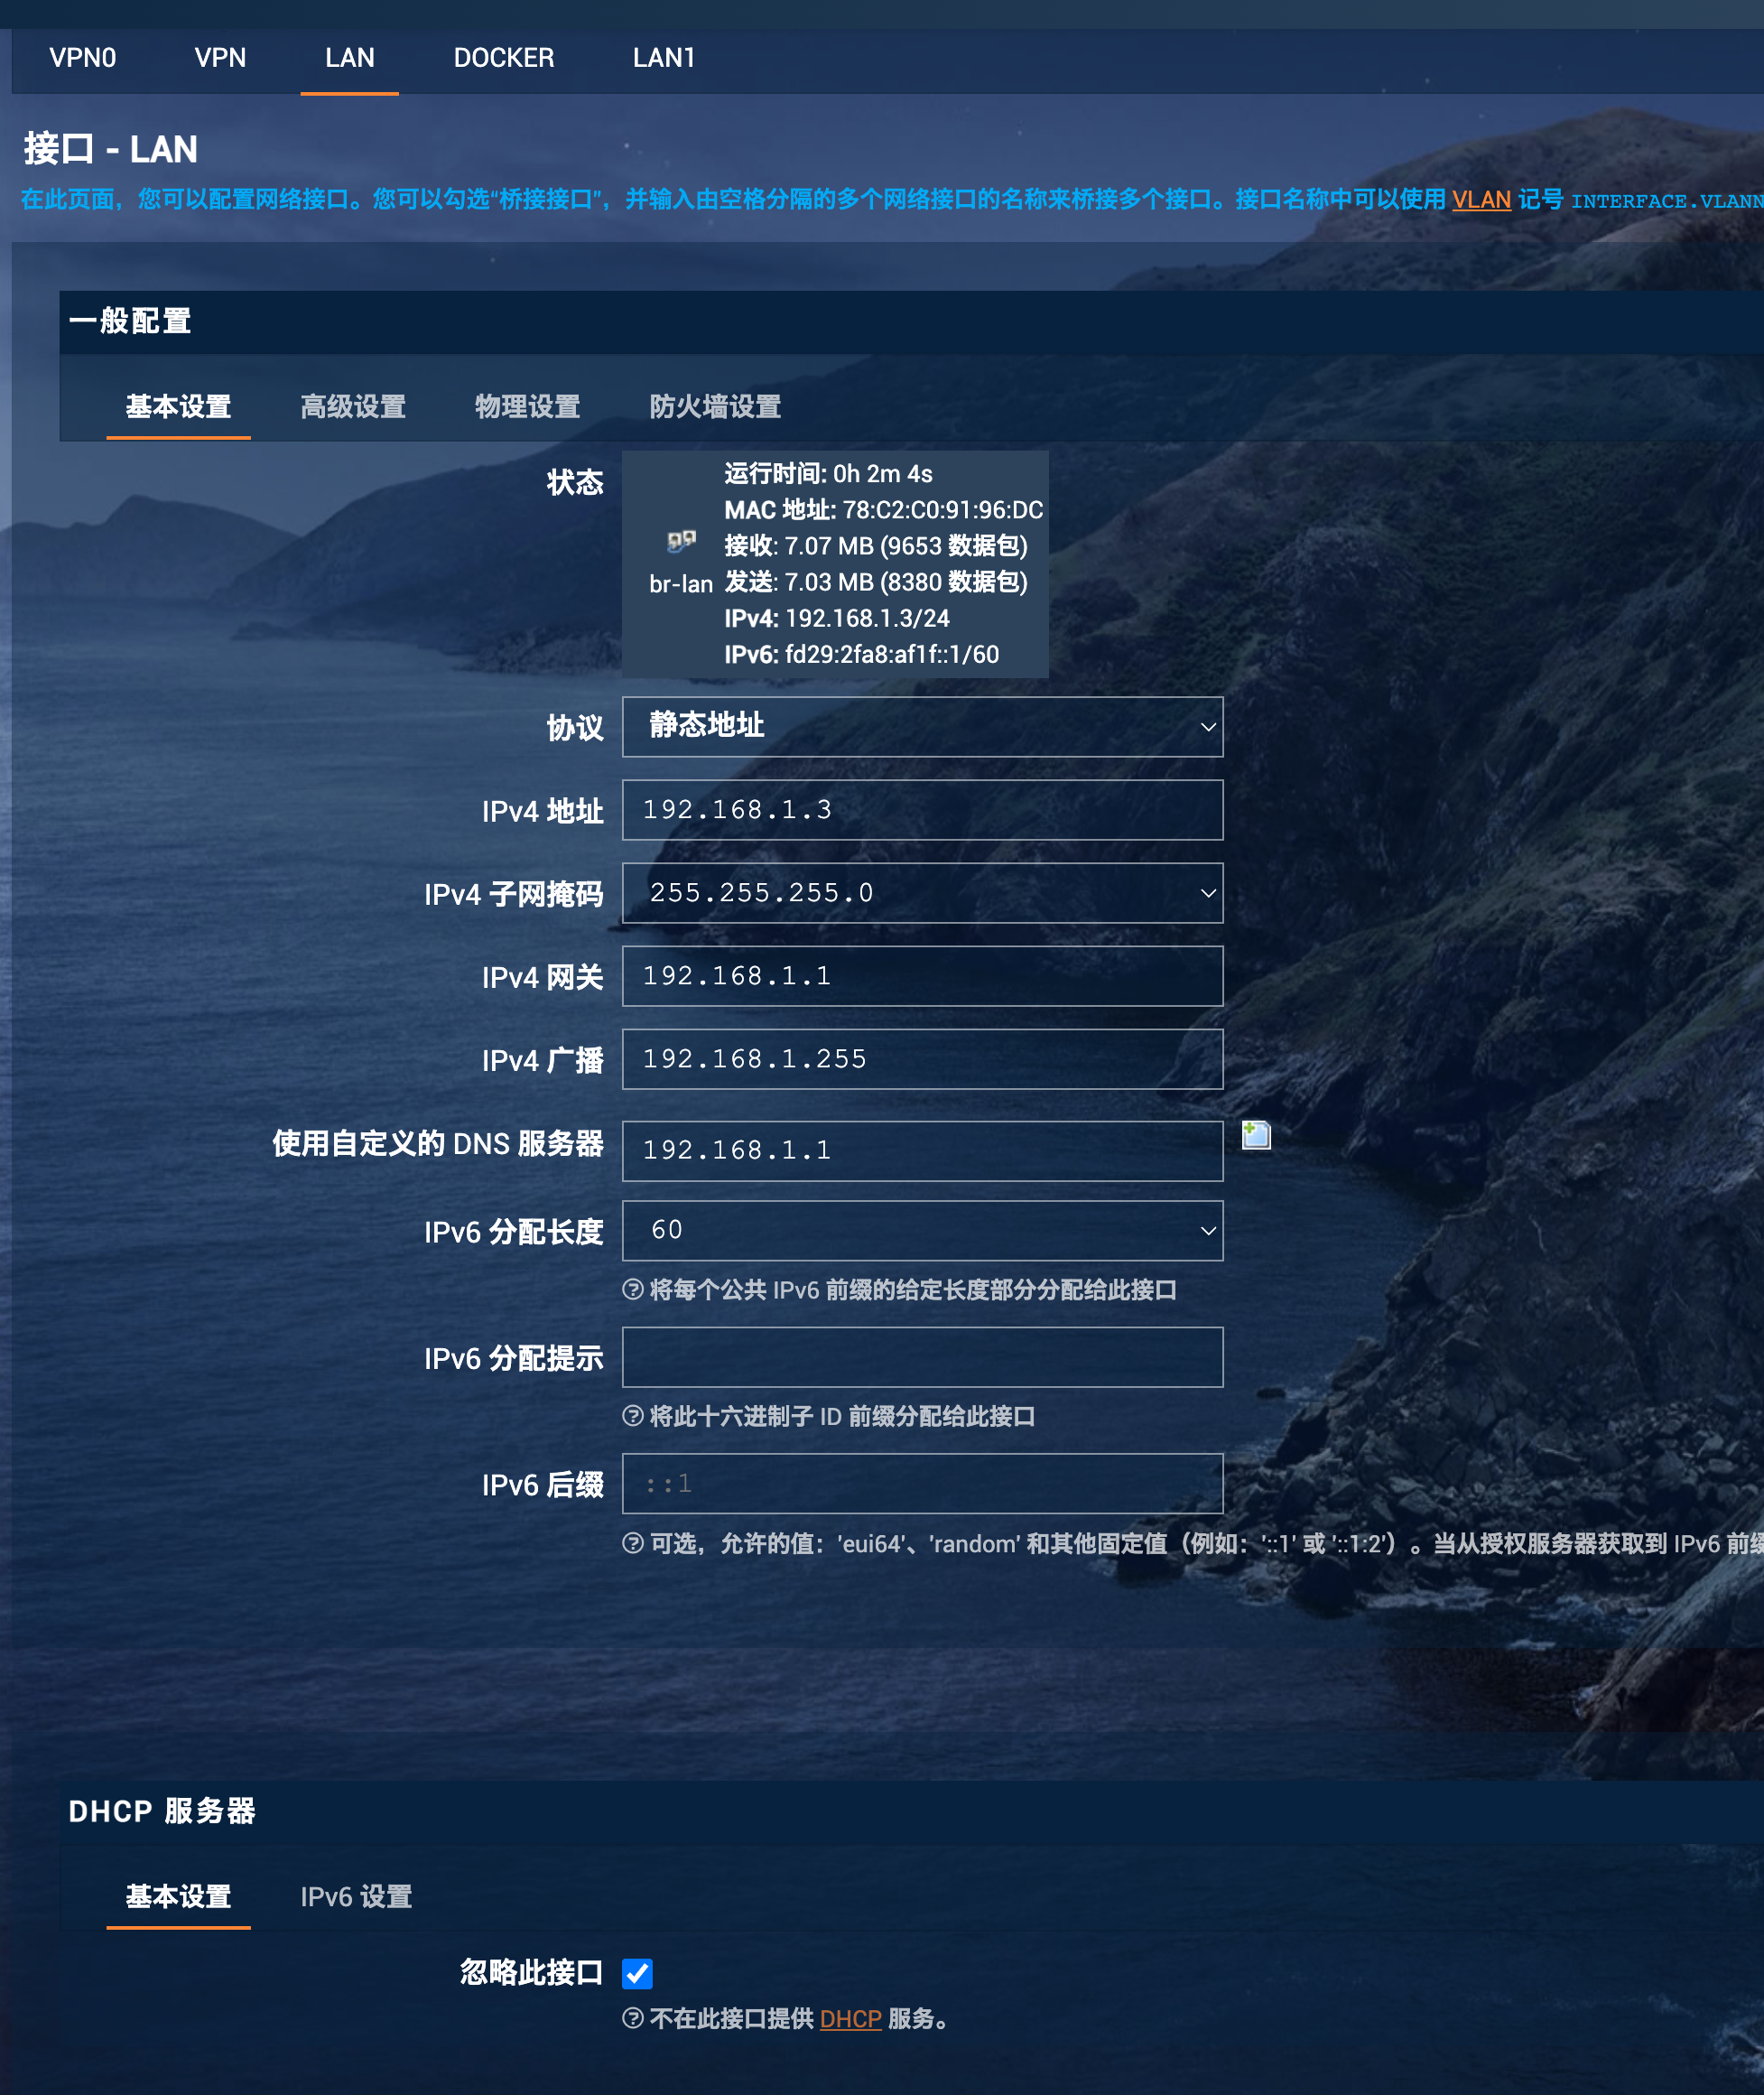
修改网络配置文件,将 IP 设置为192.168.1.3只要不是 1,就可以访问
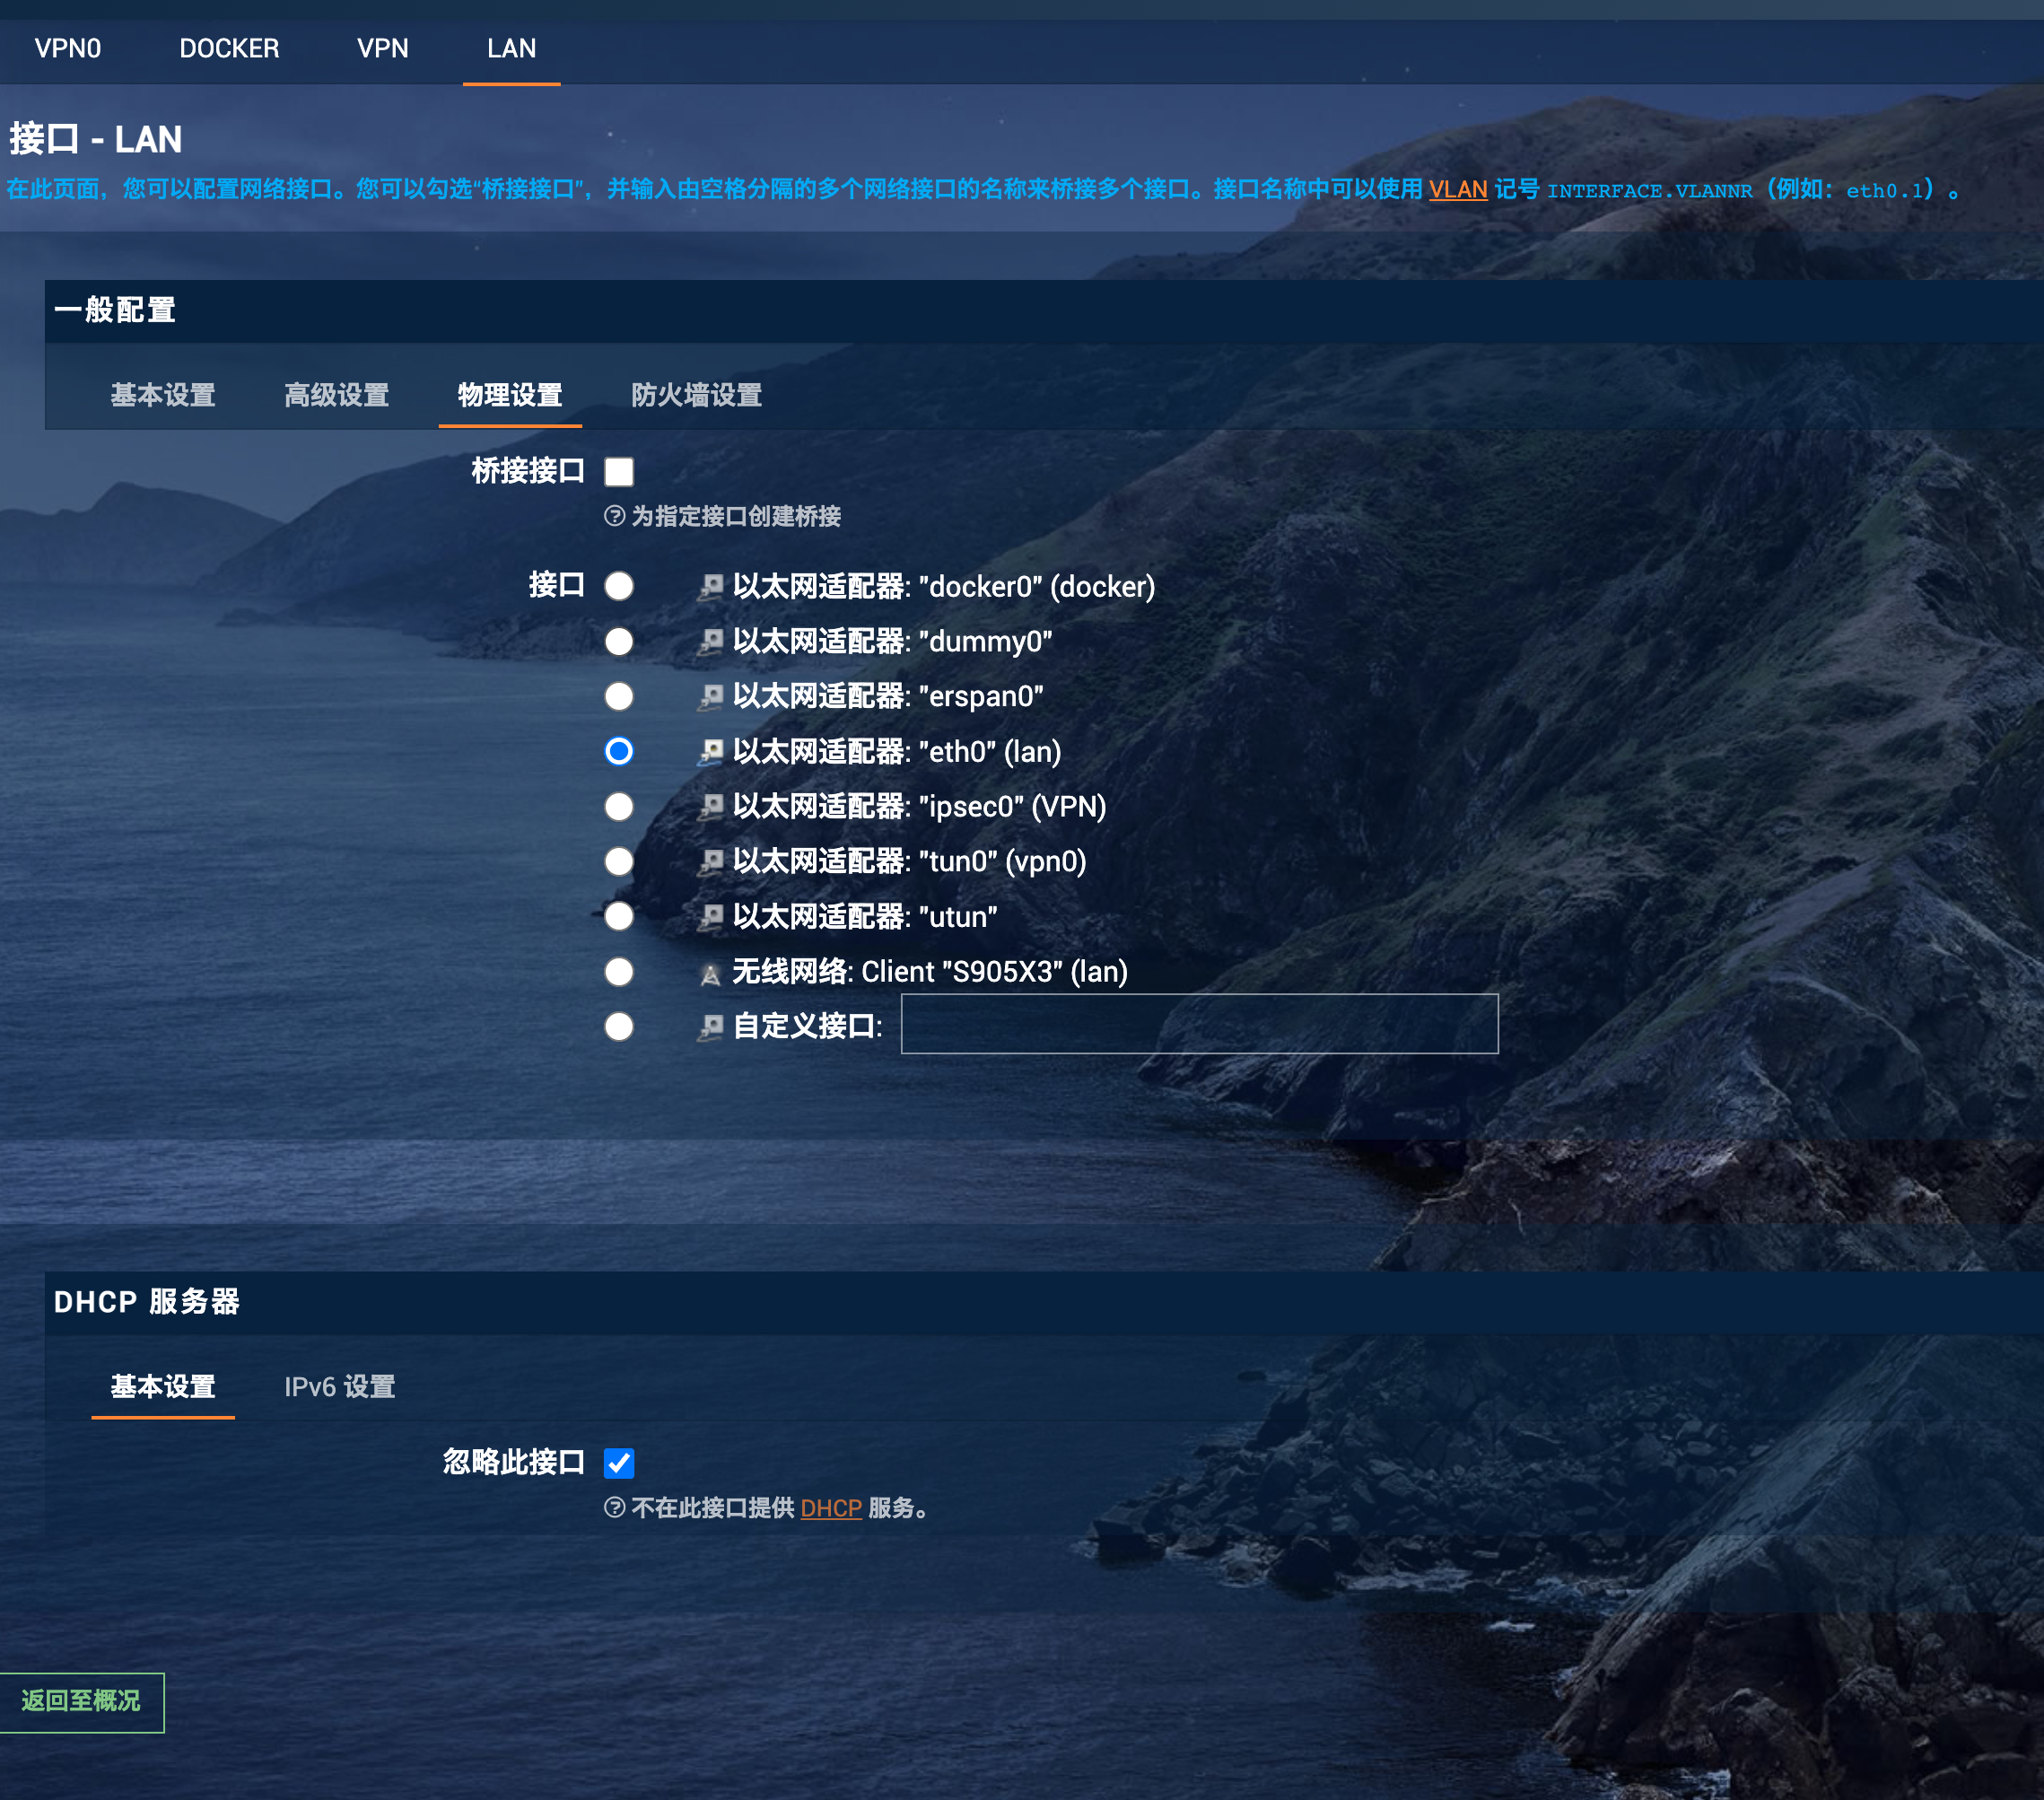
桥接模式
注意:此模式下,界面操作可能配置文件并不生效,导致主(手动设置软路由)旁网络都无法上网,需要手动修改配置文件,使用命令/etc/init.d/network reload重载网络,或者多试几次。
- 连接 S905X3 旁路由 wifi,可以直接科学上网;连接主路由 DHCP 正常上网,手动设置 IP 和 DNS,可以科学上网。详细配置如下:
打开桥接模式,接口选择以太网适配器
eth0和无线网络。 关闭旁路由 DHCP,打开 iPad 会间歇性断联 苹果系设备连接旁路由 WiFi 不稳定,或者直接连接不上旁路由 WiFi,但是可以通过连接主路由 WiFi,手动设置固定 IP 和 DNS(192.168.1.1)。
可以使用的配置具体如下
config interface 'loopback'
option ifname 'lo'
option proto 'static'
option ipaddr '127.0.0.1'
option netmask '255.0.0.0'
config globals 'globals'
option ula_prefix 'fd80:a441:42c3::/48'
config interface 'lan'
option ifname 'eth0'
option proto 'static'
option ipaddr '192.168.1.3'
option netmask '255.255.255.0'
option ip6assign '60'
option delegate '0'
option gateway '192.168.1.1'
option broadcast '192.168.1.255'
option dns '192.168.1.1'
config interface 'VPN'
option ifname 'ipsec0'
option proto 'static'
option ipaddr '10.10.10.1'
option netmask '255.255.255.0'
config interface 'vpn0'
option ifname 'tun0'
option proto 'none'
config interface 'docker'
option ifname 'docker0'
option proto 'none'
option auto '0'
config device
option type 'bridge'
option name 'docker0'


非桥接模式
注意
- 网络配置 DNS 需要添加 114,否则网速测试软件用不了。
可行配置文件如下:
config interface 'loopback'
option ifname 'lo'
option proto 'static'
option ipaddr '127.0.0.1'
option netmask '255.0.0.0'
config globals 'globals'
option ula_prefix 'fd1c:5910:ec02::/48'
config interface 'lan'
option ifname 'eth0'
option proto 'static'
option ipaddr '192.168.1.8'
option netmask '255.255.255.0'
option ip6assign '60'
option gateway '192.168.1.1'
option broadcast '192.168.1.255'
option dns '192.168.1.1 114.114.114.114'
option delegate '0'
config interface 'VPN'
option ifname 'ipsec0'
option proto 'static'
option ipaddr '10.10.10.1'
option netmask '255.255.255.0'
config interface 'vpn0'
option ifname 'tun0'
option proto 'none'
config interface 'docker'
option ifname 'docker0'
option proto 'none'
option auto '0'
config device
option type 'bridge'
option name 'docker0'


默认配置
/etc/config/network默认配置:
1 | config interface 'loopback' |
/etc/config/wireless默认配置:
1 | config wifi-device 'radio0' |
armbian 安装 Openwrt
千万不能多开 openwrt,否则开机启动不了网络,只能重装系统
如果多开不要使用同一个虚拟网卡,可能没问题,暂时未测试。 armbian 安装 openwrt OpenWrt 中,旁路由的设置与使用 可以参考 docker 镜像
piaoyizy/openwrt-aarch64的使用说明 主路由设置不需要更改 DHCP
docker命令行导入镜像
1 | gunzip -c /opt/openwrt/openwrt.tar.gz | docker load |
docker命令行保存镜像
1 | 直接将容器保存为本地镜像 |
1 | 开启网络混合模式 |
默认密码password
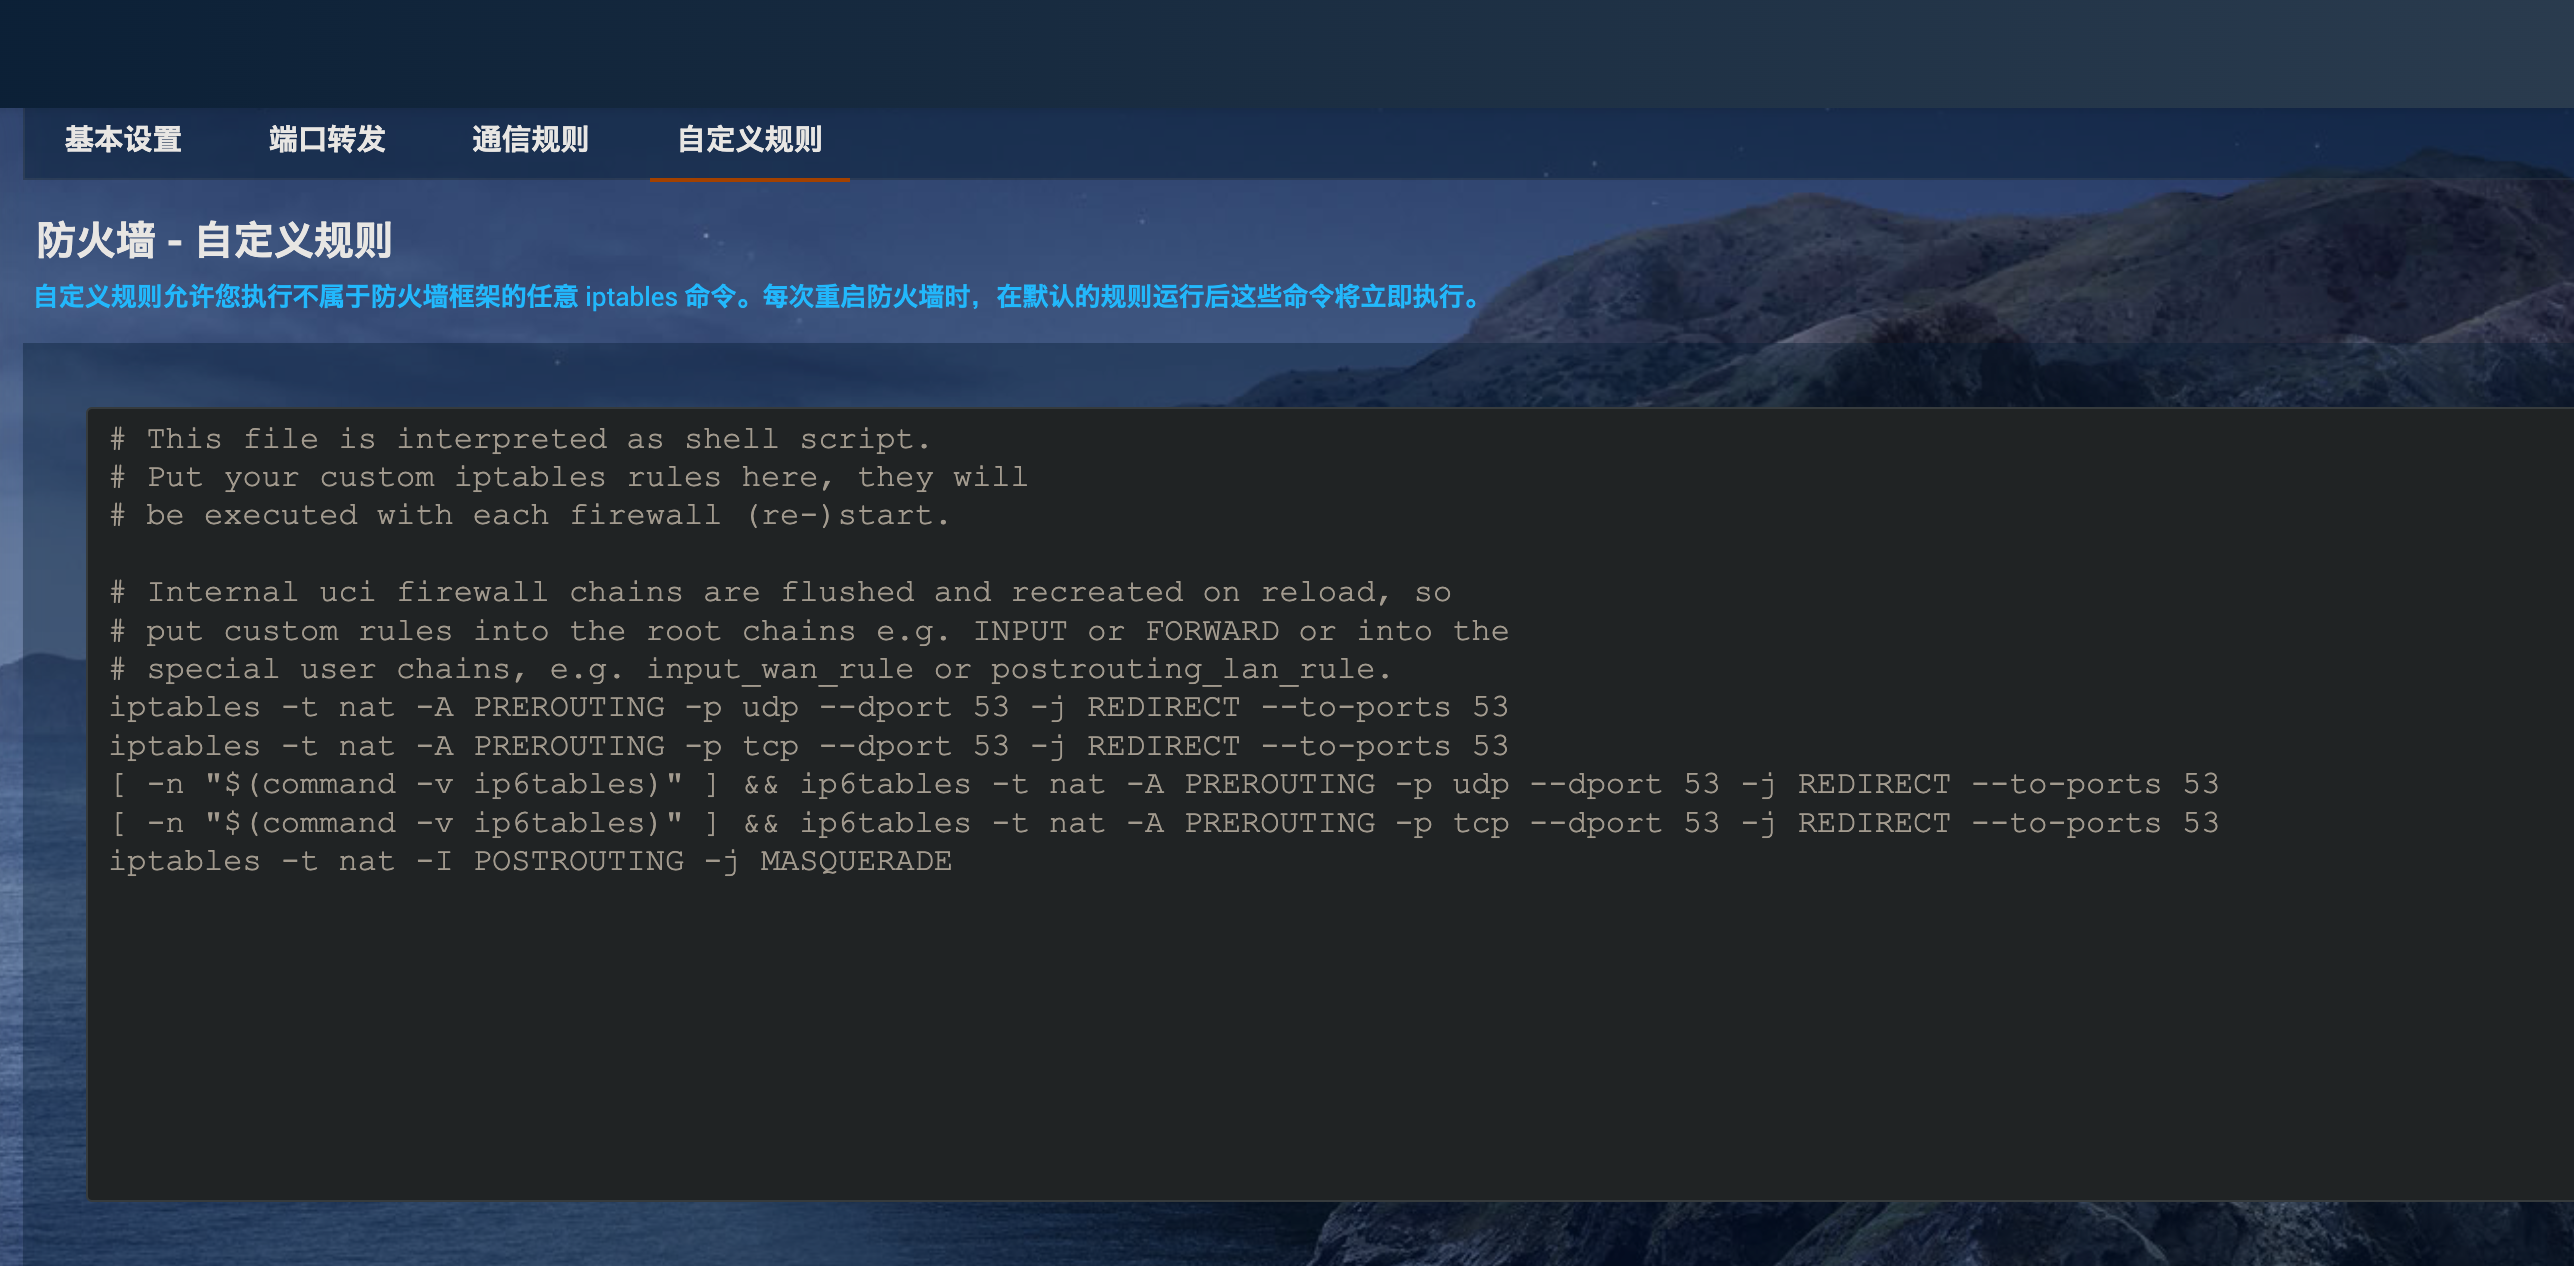
防火墙-自定义规则iptables -t nat -I POSTROUTING -j MASQUERADE
openwrt 无法访问 youtube 可能是因为浏览器设置了安全 DNS,可以试试手机是否可以访问 dns 设置
1 | 192.168.1.3 |
MacOS 安装
VMware 安装 OpenWrt 让宿主机上网&旁路由(两种方案)
重新安装 Version666
-
备份系统配置、iStore 配置、zshrc 文件,打开威力同步所有项目。
-
将系统从 sd 卡安装到 emmc
-
修改
/etc/config/network,然后/etc/init.d/network reload(修改了 TF 卡,就省略这一步) -
更换壁纸
-
从 iStore 恢复备份。如果恢复失败,手动安装以下插件
关机
AList
易有云
网心云
SFTP
-
从网页访问 Openwrt,上传备份好的配置,等待重启。
-
关闭 Docker,修改 Docker 根目录配置文件
/etc/docker/daemon.json路径/mnt/sda1/DockerConfig/docker/,重启 docker -
手动上传
openclash内核,执行
1 | /usr/share/openclash/core/ |
- 执行
1 | opkg update |
- 更换 python 源
1 | /root/.config/pip/pip.conf |
-
直接拷贝 zsh 和 oh-my-zsh 配置文件,可以省略后三步
-
执行命令,安装 Oh-my-zsh
1 | sh -c "$(curl -fsSL https://raw.githubusercontent.com/felix-fly/openwrt-ohmyzsh/master/install.sh)" |
- 拷贝 autojump、zsh-syntax-highlighting、zsh-autosuggestions 插件到 openwrt,执行
1 | cd ~/.oh-my-zsh/custom/plugins/autojump |
- 替换
~/.zshrc文件
1 | 修改 |
- 若使用 docker,此步骤跳过。修改/etc/rc.local 文件,添加
1 | sh /mnt/sda1/Config/opt/yt-dlp-web-ui/start.sh |
系统优化
1 | !/bin/sh /etc/rc.common |
插件配置
argone 主体
默认暗色主色调:#483d8b
自定义暗色主色调:#268BFE、#1E6FFF
SmartDNS
| 名称 | DNS 地址 |
|---|---|
| 谷歌 | 8.8.8.8 |
| 百度 | 180.76.76.76 |
| 阿里 | 223.5.5.5 |
| 腾讯 | 119.29.29.29 |
| 微软 | 4.2.2.2 |
| 微软 | 4.2.2.1 |
adgardhome
aria2
aria2 配置 无法打开 aria 默认配置文件/etc/config/aria2
注意,需要保证配置的文件夹都存在。否则启动不了
手动配置 aria2c -c –conf-path=/mnt/sda1/Config/etc/aria2/aria2.conf -D 查看程序是否启动ps |grep aria
### docker
docker运行ubuntu
1
2
3
4
5
6
7
8
9
10
11
12
13
14
15
16
17
18
19
20
21
22
23
24
25
26
27
docker run -d --restart=always \
-v /mnt/sda1/docker-data/ubuntu20.04:/opt \
-p 6601:6601 \
--name="ubunut20.04" ubuntu:20.04
[修改 docker 根目录](https://www.v2ex.com/t/783236)
1. 先 `/etc/init.d/dockerd stop` 停止 docker 服务
> 2. 再拷贝文件,通过 `rsync -av source-path destination-path`或者`cp -r`命令。
> 3. 然后再更改 `/etc/docker/daemon.json` 中的 `data-root` 字段,改成新的路径。ps: 如果这个 json 文件中没有这个字段,创建即可。如果不成功,就在`/etc/config/dockd`文件中。最好两者都修改一下。
> 4. 看情况把 docker 容器持久化了的配置文件 volumes 的映射的路径也转移一下
> 5. 重新启动 docker daemon ( dockerd ) `/etc/init.d/dockerd start`
## Ubuntu
```shell
docker run --restart=unless-stopped -d --dns=172.17.0.1 -u=0:0 --shm-size=512m -p 6901:6901 -e VNC_PW=1212 -e VNC_USE_HTTP=0 -e TZ=Asia/Shanghai -v /mnt:/mnt --name ubuntu linkease/desktop-ubuntu-full-arm64:latest
docker run -d --restart=always --dns=192.168.1.1 -u=0:0 --shm-size=512m -p 6901:6901 -e VNC_PW=1212 -e VNC_USE_HTTP=0 -e TZ=Asia/Shanghai -v /mnt:/mnt --name ubuntu linkease/desktop-ubuntu-full-arm64:latest
docker run -d --restart=always --network=host -e VNC_PW=1212 -e VNC_USE_HTTP=0 -e TZ=Asia/Shanghai -v /mnt:/mnt --name ubuntu linkease/desktop-ubuntu-full-arm64:latest
删除容器
docker rm ubuntu
Armbian
1 | docker pull armbian/build:latest |
常用功能
查看 smart6
openwrt 需要安装这两个插件
-
smartmontools
-
smartmontools-drivedb
1 | opkg update |
自定义目录插件
这些插件为了以后数据迁移方便,修改了默认配置目录或运行目录,迁移数据钱,需要先停止这些插件。 xxx为挂载磁盘的文件夹名称。
-
alist /mnt/xxx/opt/alist
-
可道云 /mnt/xxx/opt/kodexplorer
-
微力同步 /mnt/xxx/etc/verysync
-
filebrowser /mnt/xxx/opt/filebrowser
opkg update
opkg list-upgradable | awk -F ' - ' '{print $1}' | xargs opkg upgrade

# 强置升级
opkg update
opkg list-upgradable | cut -f 1 -d ' ' | xargs opkg upgrade --force-depends
升级 python 依赖包
opkg list-upgradable | grep python3
opkg install xxx

opkg list-upgradable | grep python3- | cut -f 1 -d ' ' | xargs opkg upgrade

opkg list-upgradable | grep luci- | cut -f 1 -d ' ' | xargs opkg upgrade

opkg list-upgradable | grep ssl | cut -f 1 -d ' ' | xargs opkg upgrade
源
HK1Rbox
修改/etc/opkg.conf文件,注释签名检查。 源配置文件目录/etc/opkg/
清华源
1 | src/gz openwrt_core https://mirrors.tuna.tsinghua.edu.cn/openwrt/releases/22.03.5/targets/armvirt/64/packages |
腾讯源
openwrt 22.03.5
1 | src/gz openwrt_core https://mirrors.cloud.tencent.com/openwrt/releases/22.03.5/targets/armvirt/64/packages |
lede snapshots
1 |
|
lede 22.03.5
1 | src/gz openwrt_core https://mirrors.cloud.tencent.com/lede/releases/22.03.5/targets/armvirt/64/packages |
lede snapshots 默认
1 | src/gz openwrt_OpenAppFilter https://mirrors.cloud.tencent.com/lede/snapshots/packages/aarch64_cortex-a53/OpenAppFilter |
问题解答
打不开 ttyd
是因为修改了的网段与编译的初始网段不一致导致,目前问题无解。

